Every iPhone rig I see online starts the same way: a cage, then a handle, then a monitor, and before long you’re carrying something heavier than a real camera. The whole point of shooting on a phone – speed – is gone.
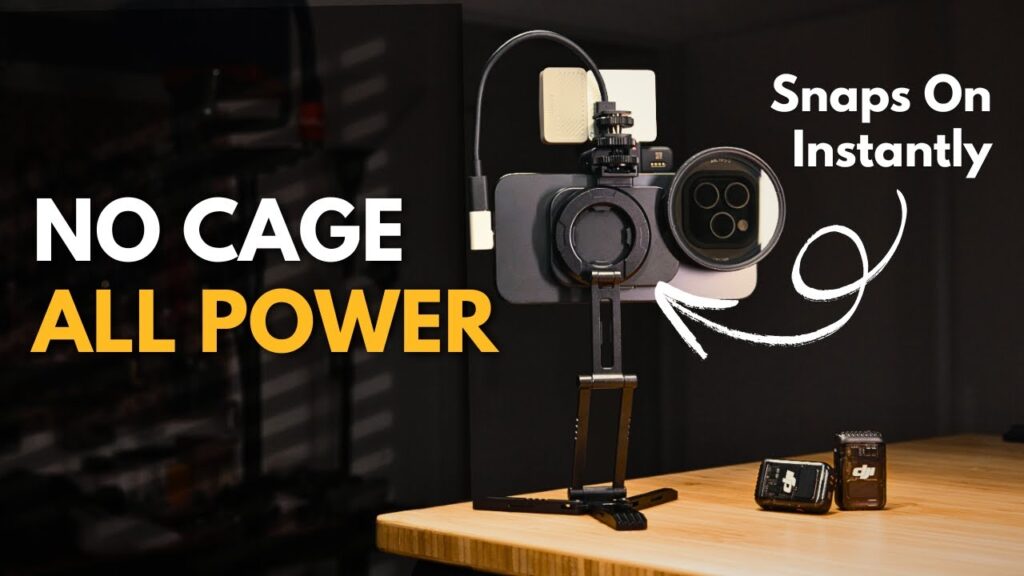
So I built the opposite. This is the fastest, most minimal rig I’ve ever put together for my iPhone 16 Pro Max. No cage, no bulk. Magnetic ND filters that snap on in seconds, ProRes 4K at 120fps recording straight to an SSD, and clean wireless audio from either a DJI Mic 2 or a Rode Wireless Pro.
In the video above I walk through the entire build piece by piece, including both complete audio setups. Here’s the written version, with notes on what to buy and what you can skip.
What you actually need
The honest answer: less than you think. The whole rig comes down to a short list of small parts, and a couple of them you probably already own.
- Magnetic mount adapter – the heart of the whole rig
- 67mm variable ND filter – or just use the camera filters you already have
- Compact tripod
- Lexar USB-C hub – buy it separately, it works out cheaper
- Cold shoe mount adapter (1/4-inch to cold shoe)
- DJI Mic 2 or Rode Wireless Pro – pick one
- L-shaped USB-C adapter
- Kit shoe extensions
- Quad Lock case – optional
Notice what’s not on that list: a cage.
The magnetic mount changes everything
The magnetic mount adapter is what makes this rig work. It snaps onto the back of the phone and gives you a standard 67mm filter thread, which means every 67mm filter you already own for your real camera now works on your iPhone.
That’s the part that sold me. I’m not buying a separate filter system for a phone. My variable ND goes on in seconds and comes off just as fast. In the video I spend a good chunk of time on this mount, plus a few tips for getting the most out of a 67mm VND on a phone, because this is exactly where most people overcomplicate things.
Tripod, SSD, and ProRes 4K
For support I use one compact tripod, and that’s it. It’s small enough to live in the bag permanently, which is the only way a tripod actually gets used. In the video I also go over the different filming styles this rig handles – there’s more flexibility here than the size suggests.
Recording ProRes 4K at 120fps eats storage, so the footage goes straight to an external SSD instead of filling up the phone. In the video I show the smallest SSD I’ve found for this job, connected through a Lexar USB-C hub. One buying note straight from the video: get the hub separately – it’s cheaper that way.
The Quad Lock case is the one genuinely optional piece. I cover it in the video, but the rig works without it, so don’t feel obligated.
Two audio setups: DJI Mic 2 or Rode Wireless Pro
Phone audio is where most iPhone footage falls apart, so I built two complete audio setups and walk through both in the back half of the video.
Setup A is the DJI Mic 2. Setup B is the Rode Wireless Pro. Both get you clean wireless audio into the phone, and the mounting hardware is the same either way – a simple 1/4-inch to cold shoe adapter, plus kit shoe extensions to put the receiver exactly where you want it.
The small part that quietly earns its keep is the L-shaped USB-C adapter. It keeps the connection low-profile instead of leaving a cable sticking straight out of the port – which, on a rig this minimal, matters more than you’d think.
Who this rig is for
If you’re a content creator, a mobile filmmaker, or just someone who wants iPhone footage that doesn’t look like iPhone footage, this is the rig I’d point you at. It sets up in seconds, and there’s nothing on it you won’t actually use.
It’s not trying to replace a full camera setup, and it doesn’t need to. What it does is remove every excuse between you and pressing record: filters on in seconds, real audio, and ProRes 4K going to fast storage. That’s most of what a big rig promises, minus the bulk.
If you want to see the rest of what I shoot with, it’s all on my gear page.